iPhone ရဲ့ location tracking ကို ဘယ်လို သုံးရမလဲ ?
Photo by Amelia Holowaty Krales / The Verge
iPhone က cell service ၊ Wi-Fi ၊ Bluetooth နှင့် GPS တို့မှ သတင်း အချက်အလက်များကို အသုံးပြု၍ ၎င်း၏ တည်နေရာကို အတိအကျ သိဖို့ အသုံးပြု ထားပါတယ်။ ထိုအချက်အလက်ဟာ အခြား သူများအား ဘယ်မှာ ရှိနေကြောင်း သိစေခြင်း (သို့) ဖုန်းပျောက်သွားသောအခါ ရှာဖွေခြင်း ကဲ့သို့ အရာ များစွာအတွက် အသုံးဝင် နိုင်ပါတယ်။ အခြား အချိန်များတွင် ၎င်းဟာ services များနှင့် ကုမ္ပဏီများမှ စုဆောင်းထားသော ဒေတာများသာ ဖြစ်ပြီး privacy စိုးရိမ်မှုများကို ဖြစ်စေ ပါတယ်။
သတင်းကောင်းကတော့ apps တွေက လိုအပ်တဲ့အခါ တည်နေရာကိုသာ သုံးနိုင်အောင် ထိန်းချုပ်မှုတွေကို ပိုပြီး လုံခြုံအောင် လုပ်နိုင်ပါတယ်။
iPhone model နဲ့ iOS ရဲ့ ဘယ် version ကို သုံးနေလဲ ပေါ် မူတည်ပြီး location settings တွေကို ပြောင်းတာက ဖုန်းတစ်ခုနဲ့ တစ်ခု မတူနိုင်ပါဘူး။ အောက်ပါ လမ်းညွှန်ချက်များကို iOS 15 သုံးသော iPhone 11 တွင် စမ်းသပ် နိုင်ပါတယ် ။ iOS ၏ အခြား version တစ်ခုကို သုံးနေရင် အများကြီး ကွာခြားမှု ရှိလိမ်မည် မဟုတ်ပါ။
TURN OFF LOCATION ACCESS FOR SPECIFIC APPS
Location data ဟာ အချို့ သော apps တွေအတွက် အသုံးဝင်ပြီး အခြား သူတွေအတွက် maps များ (သို့) ride-shares များကဲ့သို့ လိုအပ်ပါတယ်။ ဒါပေမယ့် app တစ်ခုက location ကို တောင်းပြီး data မလိုအပ်ဘူးလို့ ထင်ရင် အဲဒီ app အတွက် location services တွေကို disable လုပ်ထား နိုင်ပါတယ်။
- Settings ကို ဖွင့်ပါ။
- “Privacy” -> “Location Services.” ကို သွားပါ။
- “Location Services” က အများအားဖြင့် ဖွင့်ထားပါ လိမ့်မယ်။ location services အားလုံးကို လုံး၀ဖြတ်တောက်ချင်ရင် ( အောက်တွင်ကြည့်ပါ ) ၎င်းကို ချန်ထားလိုက်ပါ။
- location services ကို ဖွင့်ပေးတဲ့ app အားလုံး၏ list ကို ရှာဖို့ အောက်သို့ ဆွဲချပါ။ list တစ်ခုစီက application name နဲ့ permission အမျိုးအစား – “Never,” ၊ “When Shared,” (သို့) “While Using.” ဆိုပြီး ပြသ လိမ့်မယ်။ “When Shared” ဆိုတာက “Ask Next Time Or When I Share.” ဟူသော option ကို ရည်ညွှန်း ပါတယ်။ တစ်ချိန်တည်းမှာပဲ “While Using” ဆိုတာက အများအားဖြင့် “While using the App,” ကို ဆိုလိုတာ ဖြစ်သော်လည်း တစ်ခါတစ်ရံမှာ “While Using the App or Widgets.” ကို ရည်ညွှန်း နိုင်ပါတယ်။
- location data ကို specific app တစ်ခုရဲ့ access အား change ချင်တယ်ဆိုရင် application list ကို နှိပ်ပါ။
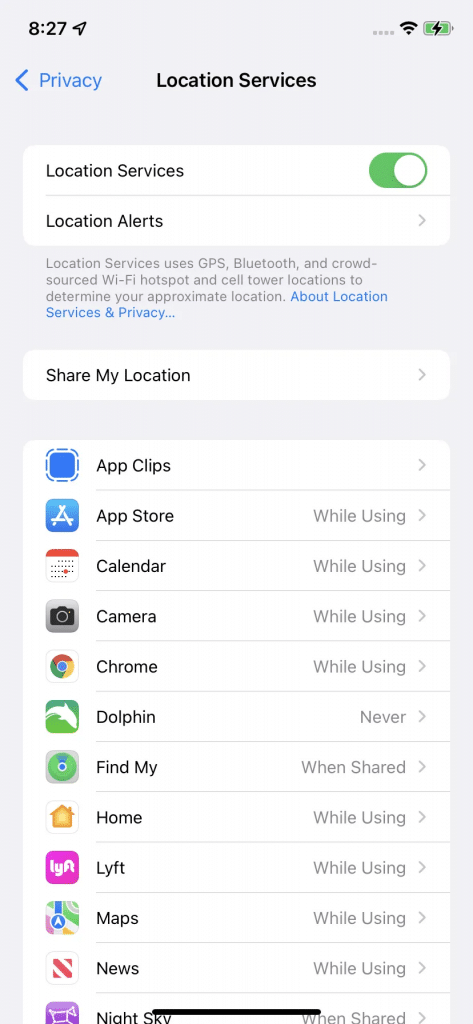
You can adjust location services for specific apps.
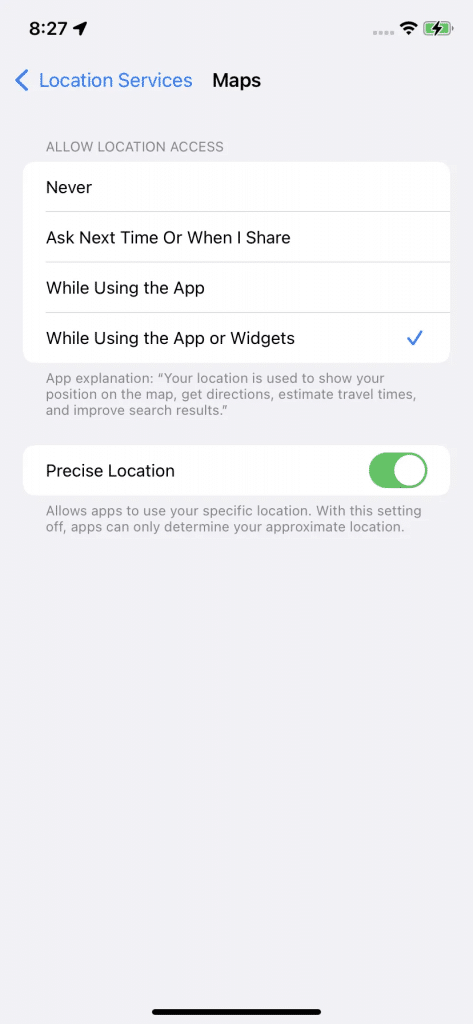
How you can allow location access depends on the app.
“While Using the App,” ကို နှိပ်လိုက်ပါက ထို app က ဖွင့်ထားတဲ့အခါ ဖြစ်စေ၊ background တွင် သုံးနေတဲ့အခါ ဖြစ်စေ location access ရပါလိမ့်မယ်။
Location access ကို ကန့်သတ်ဖို့ အခြား နည်းလမ်းတွေ အတွက် “Location Services” screen ၏ အောက်ခြေရှိ “ System Services” ကို နှိပ်ပါ။ အဲ့ဒီနေရာတွင် Wi-Fi ၊ time zone ၊ emergency calls နှင့် location နဲ့ သက်ဆိုင်တဲ့ Apple News နှင့် App Store ads အပါအ၀င် အခြား အရာများစွာအတွက် location access ကို ပြောင်းနိုင် ပါတယ်။
Service toggles အချို့၏ ဘယ်ဘက်တွင် arrow အသေးလေး တစ်ခုကို တွေ့ပါလိမ့်မယ်။ “hollow arrow” ဆိုတာက အချို့ သော အခြေအနေတွေမှာ item က location ကို access ရနိုင်တယ်လို့ ဆိုလိုခြင်း ဖြစ်ပါတယ်။ ခရမ်းရောင်မြှား ( purple arrow ) ဆိုတာက item က location ကို မကြာသေးမီက သုံးခဲ့တယ်လို့ ဆိုလိုတာ ဖြစ်ပြီး မီးခိုးရောင်မြှား ( gray arrow ) က လွန်ခဲ့သော ၂၄ နာရီအတွင်း location ကို သုံးခဲ့တာလို့ ဆိုလိုတာပဲ ဖြစ်ပါတယ်။
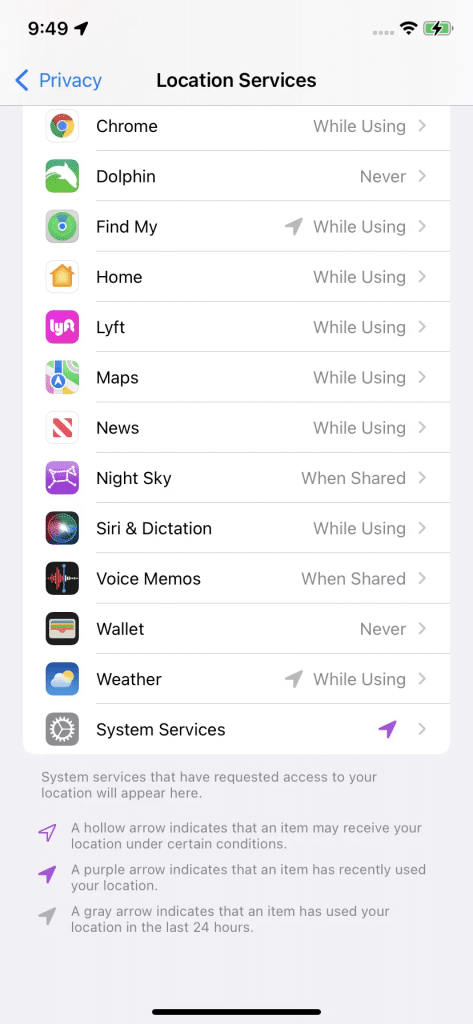
For more ways to limit location access, click on “System Services.”
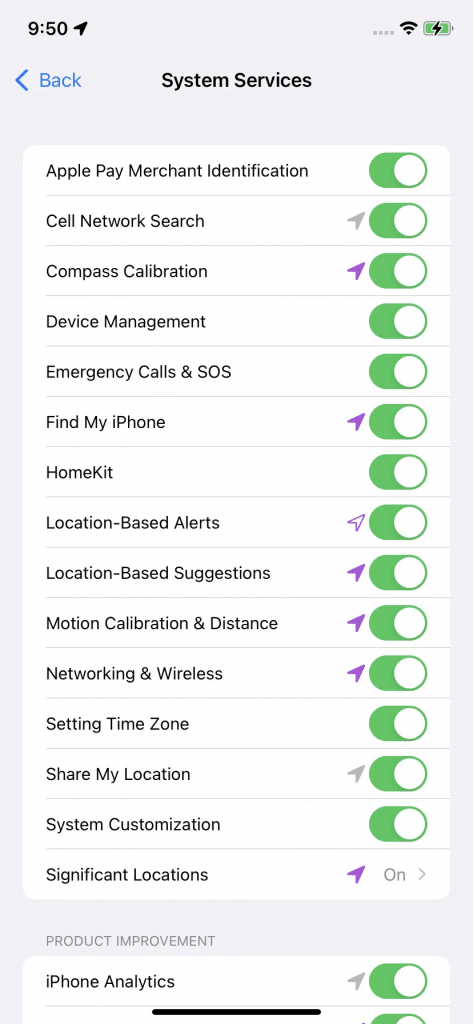
Arrows show which apps are accessing your location.
Phone က location data တွေကို collect နေတုန်းလား ဆိုတာကို စစ်ဆေးဖို့ “System Services” screen ရဲ့ အောက်ခြေကို သွားပြီး “ Status Bar Icon” အတွက် toggle ကို ဖွင့်ပါ။ ဒါက phone ရဲ့ app တစ်ခုရဲ့ location ကို access ဖြစ်နေတဲ့အခါ screen ရဲ့ ထိပ်မှာ arrow တစ်ခု ပြပါ လိမ့်မယ်။
အမှန်တကယ် grid မှ ထွက်ချင်ရင် phone မှ ဘယ် location data ကို မဆို collect လုပ်ခြင်းမှ ကာကွယ်ဖို့ location services များကို disable လုပ်နိုင် ပါတယ်။
- Settings ကို ဖွင့်ပါ။
- “Privacy” -> “Location Services.” ကို သွားပါ။
- “Location Services” toggle ကို ပိတ်လိုက်ပါ။
- Application အားလုံးအတွက် Location Services များ ပိတ်ထားမှာ ဖြစ်သော်လည်း “ Find My iPhone” ကို သုံး၍ ဖုန်းပျောက်ဆုံးနေကြောင်း သတင်းပို့ရင် ၎င်းဟာ အသိပေး ပါလိမ့်မယ် ။ “ Turn Off” ကို ရွေးပါ။
IPHONE 11 OR LATER တစ်ခုခုရှိရင်
iPhone 11 ကဲ့သို့ Apple’s U1 chip ဖြင့် ဒီဇိုင်း ထုတ်ထားသော ဖုန်းတစ်လုံး ရှိရင်၊ specific apps တွေအတွက် location services များကို ပိတ်ထားလျှင် တစ်ခါတစ်ရံ arrow ကို မြင်နေရ ပါသေးတယ်။ Apple ၏ အဆိုအရ ၊ အဲ့ဒီ models တွေက ultra wideband technology ကို သုံးသောကြောင့် ဖြစ်တယ်။ Apple က ultra broadband အသုံးပြုမှုကို ကန့်သတ်သည့် နေရာတွင် ရှိမရှိ ဆုံးဖြတ်ဖို့ ဖုန်းများက location services ကို သုံးတာလို့ ပြောထားပါတယ်။
iPhone ဟာ Location သတ်မှတ်ချက်များကို app-per-app basis တစ်ခုပေါ်မှာ သတ်မှတ်သောအခါ location data ကို တောင်းခံ ပါတယ်။ ထို့ကြောင့် phone အတွက် location services များကို ပိတ်ခြင်းဟာ location data များကို collect လုပ်နိုင်ခြင်း မရှိသောကြောင့် ဤ location requests များကို ရပ်တန့် စေပါလိမ့်မယ်။
SHARE YOUR LOCATION WITH INDIVIDUALS
ညမှာ တစ်ယောက်တည်း လမ်းလျှောက်ရင် ဒါမှမဟုတ် တစ်ယောက်တည်း Uber မှာ နေတယ်ဆိုရင် သူငယ်ချင်း ဒါမှမဟုတ် မိသားစုဝင် တစ်ယောက်က location ကို အချိန်နဲ့တစ်ပြေးညီ သိဖို့ လိုကောင်းလိုလိမ့်မယ်။ iOS 13 or later ရှိလျှင် Find My app ကို သုံး၍ location ကို မိသားစုနှင့် သူငယ်ချင်းများအား ဝေမျှ နိုင်ပါတယ်။
- “Settings.” ကို ဖွင့်ပါ။
- “Privacy,” သို့ သွားပြီး “Location Services” ကို ဖွင့်ထားပါ။
- main “Settings” menu သို့ ပြန်သွားပြီး အပေါ်ဆုံးမှာရှိတဲ့ အမည်( name )ကို နှိပ်ပါ။
- “Find My.” ကို ရွေးပါ။
- ၎င်းကို ဖွင့်ဖို့ “Share My Location” ကို ပြောင်းပါ။
- ပြီးရင် Find My app ကို သွားပါ။ ဒီ app က ပထမဆုံးအကြိမ် ဖြစ်ခဲ့ရင် location ကို သုံးချင်လားဆိုတာ မေးပါလိမ့်မယ်။ “Allow While Using App,” ၊ “Allow Once,” သို့မဟုတ် “Don’t Allow.” ကို တစ်ခုခုကို ရွေးချယ်ပါ။
- “ Find My” ကို AirTag (သို့) AirPods အတွက် သုံးနိုင်ပါတယ် ၊ ပြီးတော့ watchOS အတွက် apps တွေရှိတယ် ဆိုတာကို ရှင်းပြတဲ့ screen တစ်ခု ရနိုင်ပါတယ်။
- ပေါ်လာသော map screen တွင် screen အောက်ခြေမှာ ရှိတဲ့ “People” ကို ရွေးပါ။
- “Start Sharing Location.” ဆိုတဲ့ button ကို နှိပ်ပါ။
- “ To:” ဆိုတဲ့ အကွက်မှာ သူငယ်ချင်း (သို့မဟုတ်) မိသားစု၀င်၏ ဖုန်းနံပါတ် (သို့) နာမည်ကို ရိုက်ထည့်ပါ။
- ရွေးချယ်သောသူက iPhone နှင့် သုံးထားတာ မဟုတ်တဲ့ ဖုန်းနံပါတ်ဆိုရင် pop-up တစ်ခုနှင့် အကြောင်းကြားပါလိမ့်မယ်။ (ဒါပေမယ့် location ကို share နိုင်တုန်းပါပဲ။ )
- “ Send” ကို နှိပ်ပါ ၊ ထို့နောက် “Share for One Hour,” ၊ “Share Until End of Day,” (သို့မဟုတ်) “Share Indefinitely.” ဆိုတဲ့ တစ်ခုခုကို ရွေးချယ်ပါ။
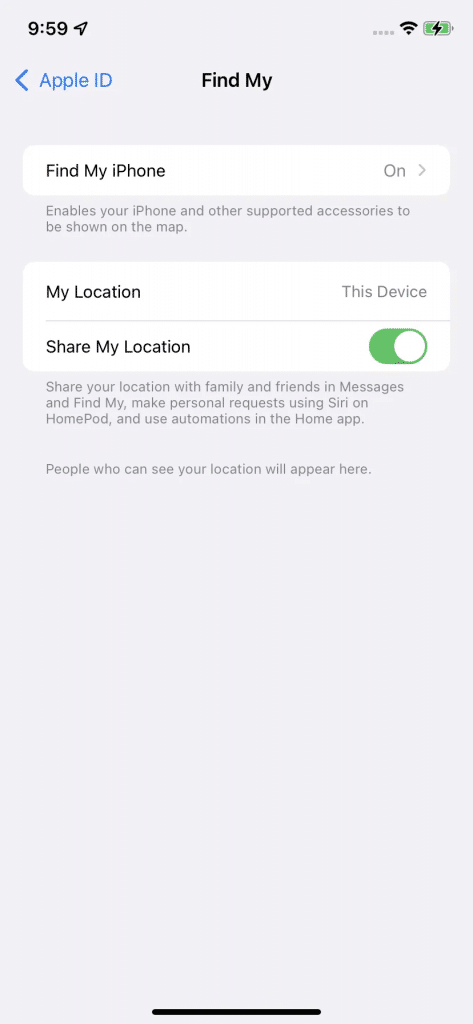
The Find My app lets you share your location.
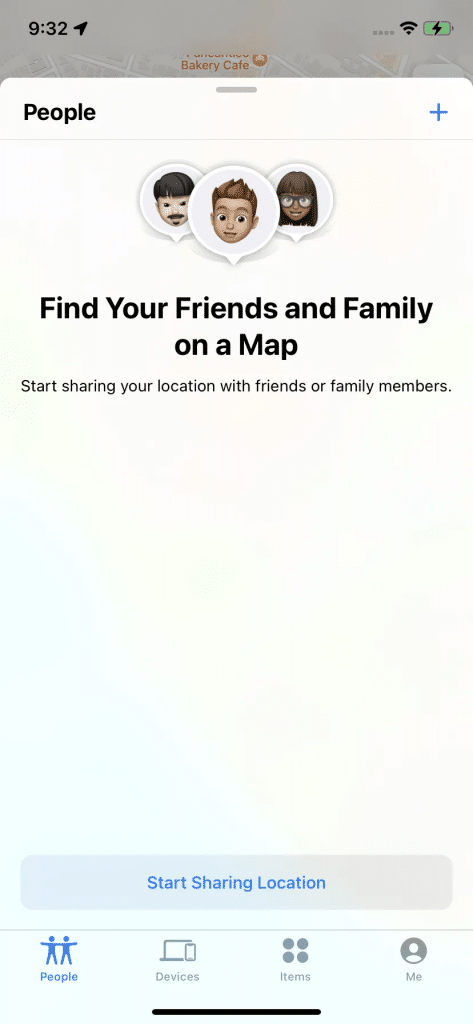
Select “Start Sharing Location” and choose whom you want to share it with.
ထို့နောက် location ကို စတင် share ပါလိမ့်မယ်။ ၎င်းကို ပိတ်ဖို့ “People,” ရဲ့ အောက်မှာရှိတဲ့ “Find My” app မှာ contact name ကို နှိပ်ပါ၊ ထို့နောက် “Stop Sharing My Location.” ကို နှိပ်ပါ။ ပေါ်လာသော “Stop Sharing Location” button ကို နှိပ်ပြီး confirm လုပ်ပေးပါ။
SEND RECURRING NOTIFICATIONS
Phone ကို ထပ်တလဲလဲ notifications တွေ ပို့ခိုင်း နိုင်တယ်။ location တစ်နေရာသို့ ရောက်တဲ့အခါ (သို့မဟုတ် မရောက်နိုင်တဲ့ အခါ ) သူငယ်ချင်းတွေ ဒါမှမဟုတ် ဆွေမျိုးတွေကို သိစေချင်ရင် ဒါတွေက အသုံးဝင်ပါတယ်။
- “Find My” app မှာ screen အောက်ခြေမှာ ရှိတဲ့ “People” tab ကို နှိပ်ပါ။
- notifications များ ပို့လိုသော လူကို ရွေးပါ ။ (၎င်းဟာ location ကို sharing လုပ်ထားပြီးသား သူတစ်ယောက်ယောက် ဖြစ်သင့်ပါတယ်) ။
- “Notifications” နှင့် “Add” tab ကို တွေ့တဲ့အထိ အောက်သို့ ဆွဲချပါ။
- အောက်ခြေမှ Pop-up တစ်ခုက ထိုလူအား အကြောင်းကြားရန် ရွေးချယ်ခွင့် ပေးပါလိမ့်မယ်။ အဲဒါကို ရွေးပါ။
သီးခြားနေရာတစ်ခုကို ရောက်တဲ့အခါ (သို့) အဲ့နေရာ မှ ထွက်ခွာသွားတဲ့အခါ ထိုလူကို အကြောင်းကြား နိုင်ပြီး ရောက်ရှိတာ ဖြစ်စေ၊ ထွက်ခွာတာ ဖြစ်စေ တစ်ကြိမ် (သို့) အကြိမ်ကြိမ် notification ပို့နိုင်ပါတယ်။ ( ဥပမာ, အလုပ်ကနေ အိမ်ကို ပြန်လာတဲ့အခါ နေ့တိုင်း တစ်ယောက်ယောက်ကို အသိပေးချင်ရင် )
SHARE VIA MESSAGES
Location ကို Messages မှတဆင့်လည်း share နိုင်ပါတယ်။
- Messages မှာ conversation တစ်ခုကို ဖွင့်ပါ။
- contact name ကို နှိပ်ပြီးနောက် “Info.” ကို နှိပ်ပါ။
- ၎င်းဟာ “Share My Location,” ဟူသော option ကို ပေးပါလိမ့်မယ်။ ၎င်းကို “Share for One Hour,” ၊ “Share Until End of Day,” သို့မဟုတ် “Share Indefinitely.” ဟူသော option ကို ပေးပါလိမ့်မယ်။ စတင် sharing လုပ်လိုသူများထဲမှ တစ်ခုကို နှိပ်ပါ။
- Sharing ကို ရပ်တန့်ချင်ရင် “Share My Location” နေရာတွင် “ Stop Sharing My Location” ကို နှိပ်ပါ။ “Stop Sharing My Location” ဟူသော label ပါတဲ့ button တစ်ခု ပေါ်လာမှာ ဖြစ်ပြီး အဲဒါကို နှိပ်ပါ။
Reference: The Verge
သတင်းဆောင်းပါးများ ဖတ်ရှုနိုင်ရန် နှင့်ရသစုံ ဗီဒီယိုများကို လက်မလွတ်တမ်း ကြည့်ရှုနိုင်ရန် Mitelar Facebook Page , Mitelar Website နှင့် Mitelar Youtube Channel တို့တွင် အသေးစိတ် ဝင်ရောက်လေ့လာကြည့်ရှုနိုင်ပြီး Like နဲ့ Followလေးလုပ်ထားဖို့လဲမမေ့ပါနဲနော်…။

