Windows PC ကို Malware ရှိ/မရှိ ဘယ်လို ( Scan )စစ်ဆေးရမလဲ ?
Illustration by Maria Chimishkyan
PC ကို malware တစ်မျိုးမျိုး ကူးစက်နေတယ်လို့ ထင်ရင် digital cleanup တစ်ခုရဲ့ တစ်စိတ်တစ်ပိုင်း အနေနဲ့ scan လုပ်ချင်ရင် Windows မှာ ကူညီနိုင်တဲ့ built-in security tool တစ်ခုရှိပါတယ်။ ၎င်းဟာ install လုပ်ဖို့ ( သို့မဟုတ်) ငွေပေးချေဖို့ Third-party software မရှိပါဘူး။ ၎င်းကို Windows Security လို့ ခေါ်ပါတယ်။
တစ်ချိန်က Windows Security ကို Windows Defender Security Center ဟု ခေါ်တွင်ခဲ့သော်လည်း app အများစုမှာ ဆင်တူ ပါတယ်။ Start menu မှာ “ Windows Defender ” ကို ရှာလိုက်ပါက Windows Security ကို တွေ့ရပါလိမ့်မယ်။ သို့သော် ယခုအချိန်မှာ Microsoft က ၎င်း၏ antivirus scanning ကို Windows Defender လို့ မကြာခဏ ရည်ညွှန်းလေ့ရှိပါတယ်။
Microsoft ၏ built-in anti-malware software ကို လုံးဝ အသုံးမ၀င်ဘူးလို့ ဟု ထင်ခဲ့ကြသော်လည်း ယနေ့ခေတ်တွင် Kaspersky နှင့် Avast ကဲ့သို့ လွတ်လပ်သော tests တွေ ( threat တွေကို ၉၉.၇% ကို ပိတ်ဆို့ခြင်း) မှာ နာမည်ကြီး လာနိုင်ပါတယ်။ Microsoft က Windows 11 နှင့်အတူ security ကို တွန်းအားပေး လုပ်ဆောင်စေခဲ့ပြီး ၎င်းက hardware အချို့ မရှိသော ကွန်ပျူတာ အဟောင်းတွေအား စိတ်ရှုပ်ထွေးစွာ ပိတ်ပစ်ဖို့အထိပင် လုပ်ဆောင်ခဲ့ ပါတယ်။ ဒါပေမယ့် ကောင်းမွန်တဲ့ old-fashioned software security နဲ့ ပတ်သက်လာရင် Windows 11 က အတော်လေး ရိုးရှင်းပါတယ်။
၎င်းကို ဖွင့်ဖို့ Start menu search တွင် “ Windows Security” ဟု ရိုက်ထည့်ပြီး ရှာနိုင်ပါတယ်။ System status ကို မြန်မြန်ဆန်ဆန် ခြုံငုံ သုံးသပ်ပေးမယ့် “ Settings”->“ Privacy & Security”->“ Windows Security” သို့ သွားပြီး ၎င်းကို ရရှိနိုင်မှာပဲ ဖြစ်ပါတယ်။ ထို့နောက် app ကို အပြည့်အ၀ ၀င်ရောက်နိုင်ဖို့ “ Open Windows Security” button ကို နှိပ်ပါ။
ဖွင့်ပြီးနောက် ၎င်းကို လုပ်ဆောင်နိုင်တဲ့ အရာ အချို့ရှိ ပါတယ်။
RUN A MALWARE SCAN ON WINDOWS 11
ပုံမှန်အားဖြင့် Windows ၏ built-in security ဟာ background မှာ run မှာ ဖြစ်ပြီး ကွန်ပျူတာသို့ ရောက်တဲ့ malicious files အမျိုးမျိုးကို ချက်ချင်း ပိတ်ဆို့ဖို့ လုပ်ပါလိမ့်မယ်။ သို့သော် အချိန်မှန်မှန် စစ်ဆေးမှုတွေ ပြုလုပ်ချင်တာဆိုရင် ကိုယ်တိုင် စကင်ဖတ်( run a scan) စစ်ဆေးနိုင်ပါတယ်။
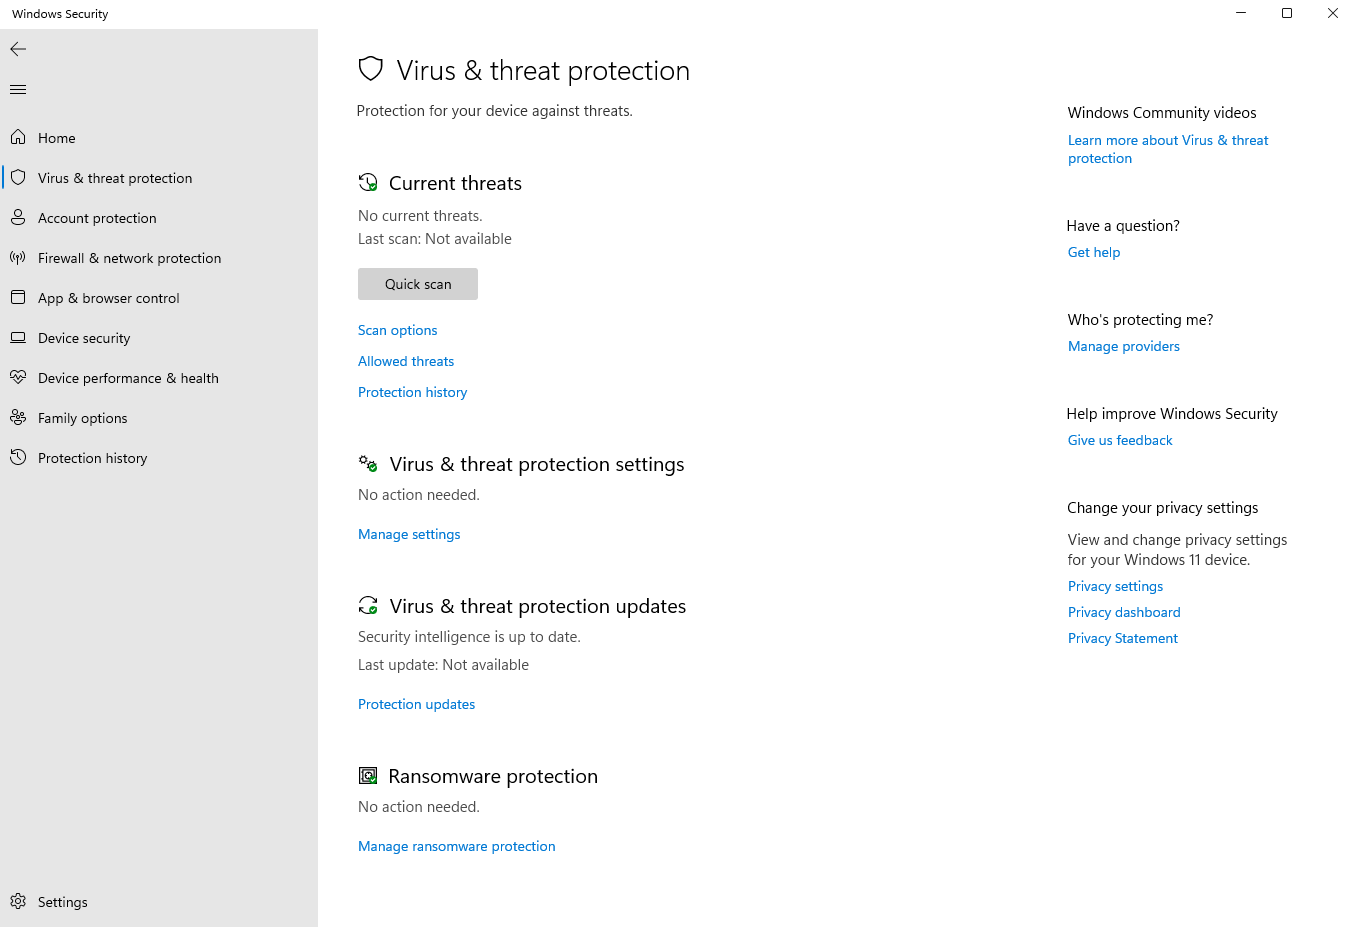
Windows Security’s built-in virus and threat protection feature.
ဒီလိုလုပ်ဖို့ “ Windows Security”->“ Virus & threat protection” ကို သွားပြီး “ Quick scan” button ကို နှိပ်ပါ။ပိုပြီး စေ့စေ့စပ်စပ် စစ်ဆေးမယ်ဆိုရင် ကြာတယ်ဆိုပေမယ့် files run နေတဲ့ programs တွေ အားလုံးကို ပိုသေချာတဲ့ scan လုပ်ချင်ရင် အဲဒီအစား “Scan options” button ကို နှိပ်ပြီး “ Full scan” ကို ရွေးနိုင်ပါတယ်။ Scan ဖတ်နေတုန်း Windows က malware တွေ့တယ်ဆိုရင် ကွန်ပျူတာမှ virus(es) ကို ဖယ်ရှားခြင်း process ကို စတင်ဖို့ “Start actions” button ကို နှိပ်ပါ။
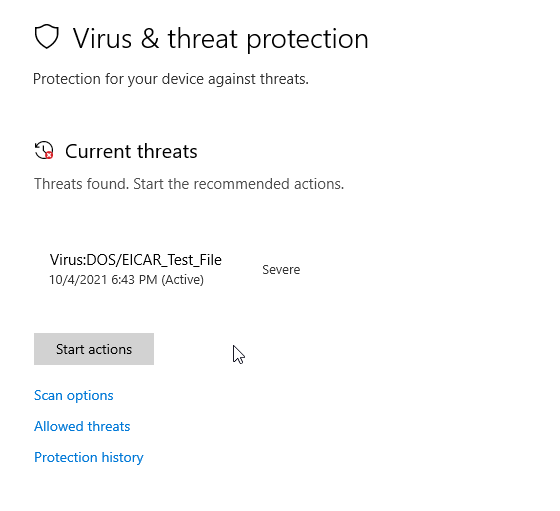
Clicking Start actions will remove malware from your computer.
Scan စစ်ဆေးမှုက ဘာမှ ဖြစ်မလာဘူးဆိုရင် scan စစ်ဆေးမှု ကြာချိန် ၊ files များစွာ scan စစ်ဆေးမှု နှင့် scan စစ်ဆေးတဲအခါ report တစ်ခုကို တွေ့ရပါလိမ့်မယ်။
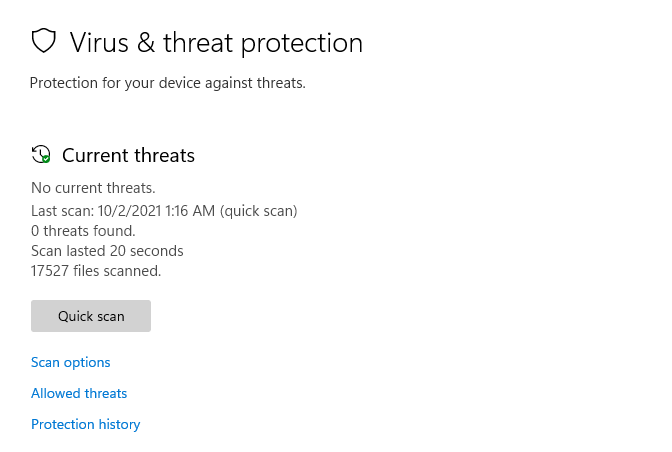
A clean bill of health from Windows Security.
KEEP WINDOWS SECURITY UP TO DATE
Windows ကို နောက်ကွယ်ကနေ viruses တွေ အမြဲ ရှာဖွေနေတာ သေချာချင်ရင် “ Windows Security” -> “ Virus & threat protection” -> “ Virus and threat protection settings” ကို သွားနိုင် ပါတယ်။ “ Manage settings” ကို နှိပ်ပြီး “ Real-time protection” option ကို “off” ဖြစ်နေတာ ဆိုရင် “on” ပေးပါ။
ကွန်ပျူတာက latest antivirus definitions များကို သေချာစေဖို့ “ Windows Security” -> “ Virus & threat protection” -> “ Virus and threat protection settings” ကို သွားနိုင် ပါတယ်။ “ Manage settings” ကို နှိပ်ပြီး “Cloud-delivered protection” option ကို “on” ပေးပါ။
Windows 11 ဟာ ယေဘူယျအားဖြင့် သူ့ဘာသာသူ update လုပ်ဖို့ အကောင်းဆုံး လုပ်ဆောင်သော်လည်း ကိုယ်တိုင် စစ်ဆေးဖို့ “ Settings” ->“ Windows update,” ကို သွားနိုင် ပါတယ်။ ၎င်းကို ဘယ်ဘက် အောက်ခြေနှင့် ညာဘက်ထိပ် နှစ်ခုလုံးတွင် တွေ့နိုင်ပါတယ်။ ထိုနေရာကတေ “Check for updates” button ကို နှိပ်ပါ။ Start menu search bar မှာလည်း “ Windows Update” screen သို့ တိုက်ရိုက်သွားဖို့ “check for updates” ဟု ရိုက်ထည့် နိုင်ပါတယ်။
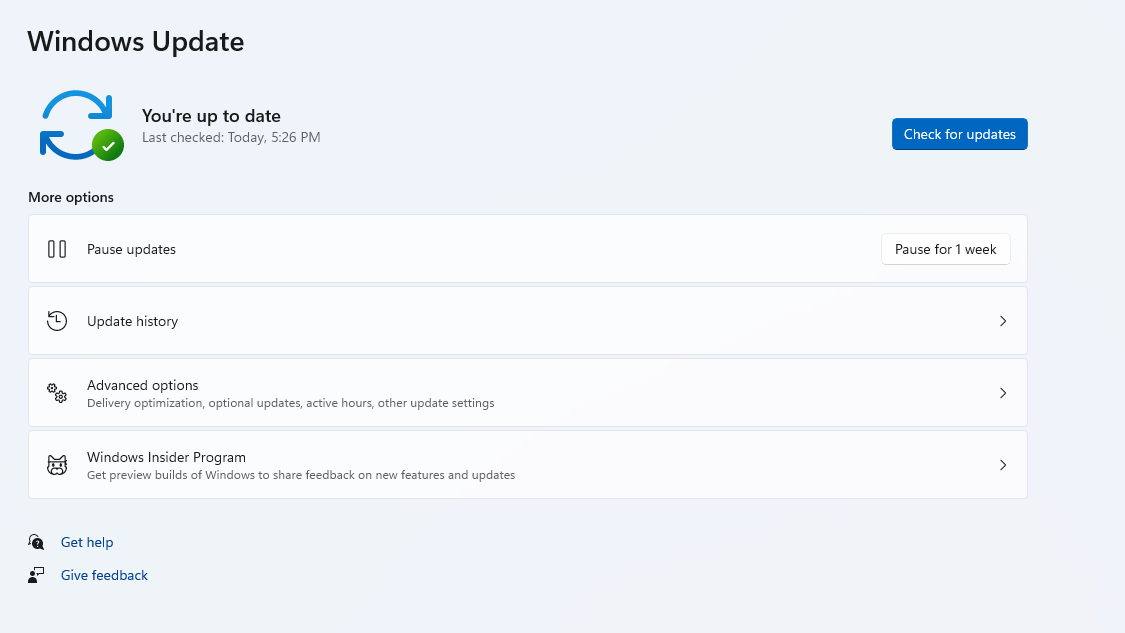
You can make sure your computer is up-to-date in Settings.
Microsoft Store မှ apps များစွာကို install လုပ်ထားတာ ဆိုရင် ၎င်းကို Microsoft Store ဖွင့်၍( window ၏ ဘယ်ဘက် အောက်ခြေမှာ ရှိတဲ့ “Library” ကို သွားပြီး Updates ရယူဖို့ “Get Updates” button ကို နှိပ်ပါ။
IF YOU STILL HAVE WINDOWS 10
အကယ်၍ Windows 10 ၏ latest version ကို သုံးနေတာဆိုရင် virus scan တစ်ခု Run ဖို့ အတွက် process ဟာ Windows 11 နှင့် များစွာ တူပါလိမ့်မယ်။ အချို့သော Windows 10 older versions တွေမှာ Windows Defender Security Center application ကို သုံးပါလိမ့်မယ်။ သို့သော် app ကို ဖွင့်ပြီးနောက် process တွေက များစွာ တူပါလိမ့်မယ်။
PC မှာ Virus ကူးစက်ခံရတဲ့ လက္ခဏာက ဘာလဲ ?
Malware က shapes အမျိုးမျိုး နှင့် forms အမျိုးမျိုးဖြင့် ရောက်လာသော်လည်း ၎င်းကို ကွန်ပျူတာတွင် ပြုလုပ်နိုင်တဲ့ အရာ အချို့ ရှိပါတယ်။ ဘာမှမလုပ်ဘဲ search engine ၊ browser homepage ၊ ဒါမှမဟုတ် desktop wallpaper တွေ ပြောင်းသွားတာကို သတိထားမိပြီဆိုရင် ၎င်းဟာ အထက်တွင် ဖော်ပြထားတဲ့အတိုင်း scan လုပ်ဖို့ အချိန် ဖြစ်နိုင် ပါတယ်။
အခြား symptoms တွေမှာ ကွန်ပျူတာက ပုံမှန်ထက် ပိုပူနေတာ သို့မဟုတ် ပိုနှေးကွေးတာ ယခင်က မတွေ့ဖူးတဲ့ popups တွေ ( သို့မဟုတ် ) notificationsတွေကို မြင်ရတာတို့ ဖြစ်နိုင် ပါတယ်။
Google မှာ malware ၏ အဖြစ်များတဲ့ common symptoms အချို့ကို ဖော်ပြတဲ့ ကြီးကျယ်သော video တစ်ခု ရှိပါတယ်။
IF WINDOWS DETECTS A THREAT
Microsoft Security app ကနေ notification တစ်ခု ရတယ်ဆိုရင် threat တစ်ခုကို တွေ့ရှိကြောင်း ၊ ပြဿနာကို ဖြေရှင်းပြီးသား ဖြစ်ကောင်း ဖြစ်နိုင်ပါတယ်။ သို့သော် ၎င်း notification ကို နှစ်ခါပြန် စစ်ဆေးသင့် ပါတယ်။ အချို့သော malware တွေ (အထူးသဖြင့် malicious web adsတွေ ) ဟာ ၎င်းတို့အား နှိပ်ဖို့ antivirus notification တစ်ခု အဖြစ် ဟန်ဆောင်ပါလိမ့်မယ်။
Windows Security notificationsတွေဟာ အောက်တွင် ပြထားသော ပုံနှင့်တူပြီး screen ၏ ညာဘက် အပေါ်ထောင့်တွင် ပေါ်လာပါလိမ့်မယ်။ ၎င်းတို့ ပျောက်ကွယ်သွားပါက ၎င်းတို့အား notification screen ပေါ်တွင် ပြသပါလိမ့်မယ်။၎င်းကို taskbar ရှိ clock ပေါ်တွင် နှိပ်ပြီး ပါတယ်။
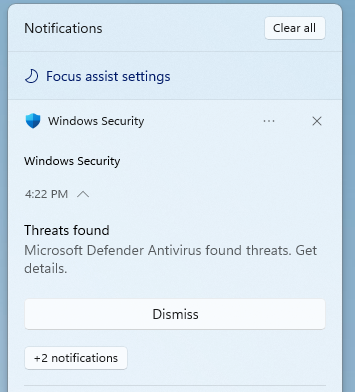
An example of the notification you’ll get if Windows Security finds a suspicious file.
WHITELISTING A FILE
anti-malware software ဟာ မကောင်းတဲ့ files တွေကိုသာ flag ပြပြီး ကောင်းတာတွေကို ချန်ထား သော်လည်း တစ်ခါတစ်ရံ မှားနေပါလိမ့်မယ်။ Windows ဟာ အမှားတစ်ခု လုပ်မိသည်နှင့် ၎င်းတွင် မရှိသင့်သော file တစ်ခုကို ဖျက်လိုက်ကြောင်း သေချာလျှင် ၎င်းကို ပြန်လည် ရယူနိုင်ပါတယ်။
မလုပ်မီ file တစ်ခုကို ပို့လိုက်တဲ့ သူကို ယုံကြည်ခြင်းကြောင့် ၎င်းဟာ file က လုံခြုံတယ်ဟု မဆိုလိုပါ။လူတွေရဲ့ emails တွေကို ခိုးယူပြီး သူတို့ရဲ့ contacts တွေဆီကို copies တွေ ပို့နိုင်တဲ့ malware အချို့ ရှိပါတယ်။ ယုံကြည်ရသော သူတစ် ဦး ထံမှ သံသယဖြစ်ဖွယ် file တစ်ခုကို လက်ခံရရှိပါက ၎င်းကို မဖွင့်မီ ၎င်းတို့အား သေချာ မေးဖို့ ကောင်းပါတယ်။
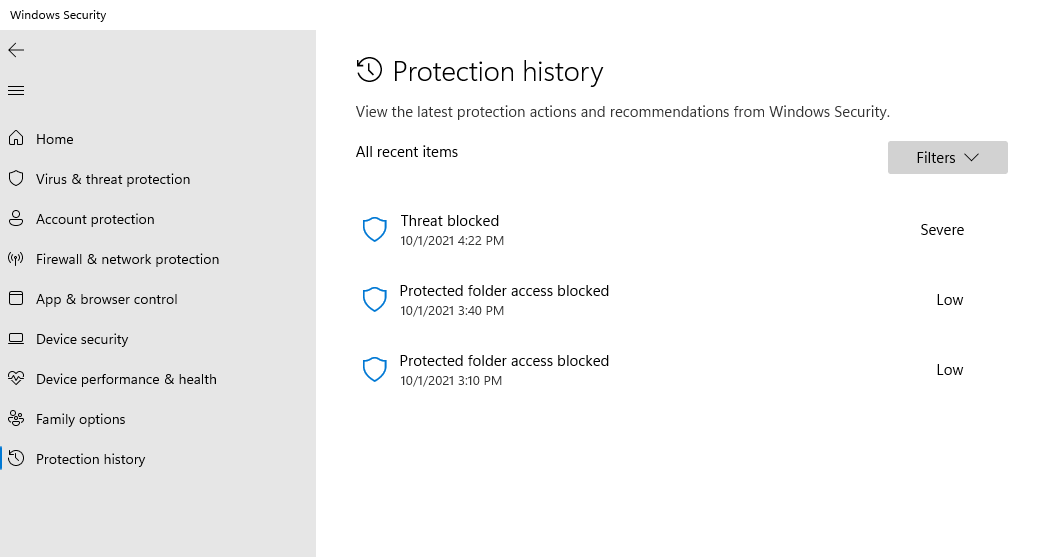
The Protection history screen will show you the incidents Windows Security has monitored.
မှားယွင်းစွာ ဖော်ပြထားသော file ကို ကြည့်ပြီး ပြန်ယူဖို့ “ Windows Security” ->“ Virus and threat protection” ->“ Protection history” သို့ သွားပါ။ထိုတွင် Windows Security မှ ၎င်းတို့၏ severity level နှင့်အတူ တွေ့ရသော ဘယ်လို threats ကိုမဆို တွေ့ရပါလိမ့်မယ်။ file တစ်ခုကို ပြန်ယူဖို့ (နောက်တစ်ခါ မလုပ်ခင် အရမ်းသတိထားသင့်တယ်) entry ကို နှိပ်ပါ။ ထို့နောက် “Allow” button ကို ၀င်ရောက်နိုင်ဖို့ “Actions” button ကို နှိပ်ပါ။
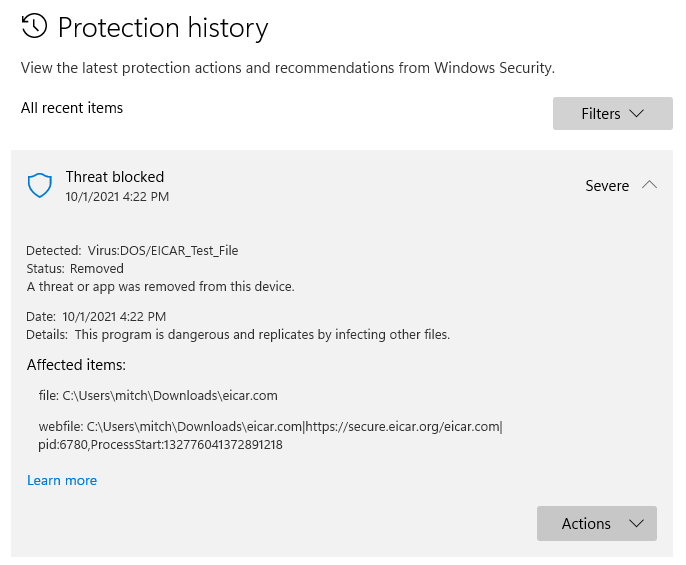
The Protection history screen can give you details about a detected virus, such as where it was found, and what type of malware it is.
“ Quarantined” ခွင့်ပြုတယ်ဆိုပါက ၎င်းအား ကွန်ပျူတာထဲသို့ ပြန်ထည့် ပေးပါလိမ့်မယ်။ ၎င်း၏ status က “Removed,” ဖြစ်ရင် ၎င်းကို ထပ်မံ download လုပ်ဖို့ လိုအပ်သော်လည်း Microsoft Security က ရပ်တန့်လို့ ရမှာ မဟုတ်ပါဘူး။
“ Windows Security” ->“ Virus & threat protection” ->“ Allowed threats ” သို့ သွားပြီး ခွင့်ပြုထားတဲ့ တွေ့ရှိထားသော files တွေ list တစ်ခုကို ကြည့်နိုင် ပါတယ်။ သူတို့က တကယ်ပဲ threat တစ်ခုလို့ ဆုံးဖြတ်ခဲ့ရင် သူတို့ကို နှိပ်ပြီး ပြန်ဖျက်နိုင်ပါတယ်။ ပြီးရင် “Don’t allow” button ကို နှိပ်ပါ။
WHEN THINGS GET NASTY
တစ်ခါတစ်ရံ သူတို့ကို ဖယ်ရှားရန် ကြိုးစားသောအခါ ပြန်တိုက်ခိုက်သော virusesတွေ (သို့) malware အပိုင်းတွေ ရှိပါတယ်။ ဒါကို ကိုင်တွယ်ဖြေရှင်းဖို့ Windows မှာ သူ့ရဲ့ antivirus scan ရဲ့ extra-strength version တစ်ခု ရှိပါတယ်။ ၎င်းကို run ရန် “ Windows Security” ->“ Virus & threat protection” ->“ Scan options” သို့ သွားပြီး “ Microsoft Defender Offline scan” ကို ရွေးပါ။ “Scan now” button ကို နှိပ်ပြီးနောက် scan စစ်ဆေးရန် ကွန်ပျူတာက special mode တစ်ခုဖြင့် ပြန်လည် စတင်ပါလိမ့်မယ်။ပြီးသည်နှင့် ကွန်ပျူတာက Windows သို့ ပြန်ရောက် စေပါလိမ့်မယ်။
ကွန်ပျူတာမှာ ကူးစက်ခံရတဲ့ လက္ခဏာတွေ ပြနေသေးရင် The Verge က Malwarebytes ရဲ့ free version ကို machines တွေနဲ့ အကြိမ်အနည်းငယ်ထက် ပိုပြီး save ပေးခဲ့ပါတယ်။(Malware အချို့ဟာ additional security apps အမျိုးမျိုး install လုပ်ခြင်းမှ တားဆီးနိုင်တာ ဖြစ်သောကြောင့် Malwarebytes ကို ကွန်ပျူတာတွင် ရှိပြီးသားဖြစ်ဖို့ လိုပါတယ်။ ) PC က lock ချထားဆဲ (သို့) ၎င်းအား unlock လုပ်ဖိုထ့ တစ်စုံတစ်ဦး ထံ ပေးပို့ဖို့ လိုအပ်ကြောင်း ရုတ်တရက် အကြောင်းကြားလာလျှင် IT professional တစ် ဦး ကို ဆက်သွယ်ဖို့ လိုအပ်လာပြီပဲ ဖြစ်ပါတယ်။
THIRD-PARTY ANTI-MALWARE APPS
Windows Security ဟာ computer viruses ၊ malware နှင့် အခြား nasty files တွေမှ ကာကွယ်ဖို့ ကောင်းမွန်စွာ လုပ်ဆောင်သင့်သော်လည်း Windows 11 မှာတောင်မှ မလုပ်ဆောင်နိုင်တဲ့ အရာတွေရှိနေပါသေးတယ်။ built-in tools တွေက email phishing scams တွေ (သို့မဟုတ်) web browser တွင် scam ads တွေမှ ကာကွယ်နိုင်မှာ မဟုတ်ပါဘူး။
Basic Windows Security ကနေ game ကို မြှင့်တင်ချင်ရင် McAfee ၊ Norton 360 ၊ Kaspersky (သို့မဟုတ်) Bitdefender တို့လို anti-malware suite တွေကို စစ်ဆေးဖို့ လိုချင်လာပါလိမ့်တယ်။ Reviews အနည်းငယ်ကို ရှာဖွေပြီး လိုအပ်တဲ့ အရာ (နှင့် မလိုအပ်တဲ့အရာ – crypto miners များ ပါ၀င်သော programs များကို ကြည့်ရှုခြင်းဖြင့် ) ကို idea ကောင်း တစ်ခုပေးပါလိမ့်မယ်။
anti-malware systems များစွာ သုံးခြင်း၏ အန္တရာယ်များကို ကြားဖူးထားရင်လဲ စိတ်မပူပါနဲ့။ Microsoft က ၎င်း၏ built-in solution က အခြား antivirus တွေကို install လုပ်ပြီး activate လုပ်ထားတာကို တွေ့ရင် အလိုအလျောက် ပိတ်သွားလိမ့်မယ် ဟု ပြောကြားခဲ့ပါတယ်။ အခြား anti-malware app ကို uninstall လုပ်ပါက Microsoft ၏ built-in solution က အလိုအလျောက် ပြန်ဖွင့် ပေးသင့်ပါတယ်။
Reference: The Verge
သတင်းဆောင်းပါးများ ဖတ်ရှုနိုင်ရန် နှင့်ရသစုံ ဗီဒီယိုများကို လက်မလွတ်တမ်း ကြည့်ရှုနိုင်ရန် Mitelar Facebook Page , Mitelar Website နှင့် Mitelar Youtube Channel တို့တွင် အသေးစိတ် ဝင်ရောက်လေ့လာကြည့်ရှုနိုင်ပြီး Like နဲ့ Followလေးလုပ်ထားဖို့လဲမမေ့ပါနဲနော်…။


